Insulation: Peeling Back the Layers on Home Walls
By Jeff Eckes | Summer 2025 | Features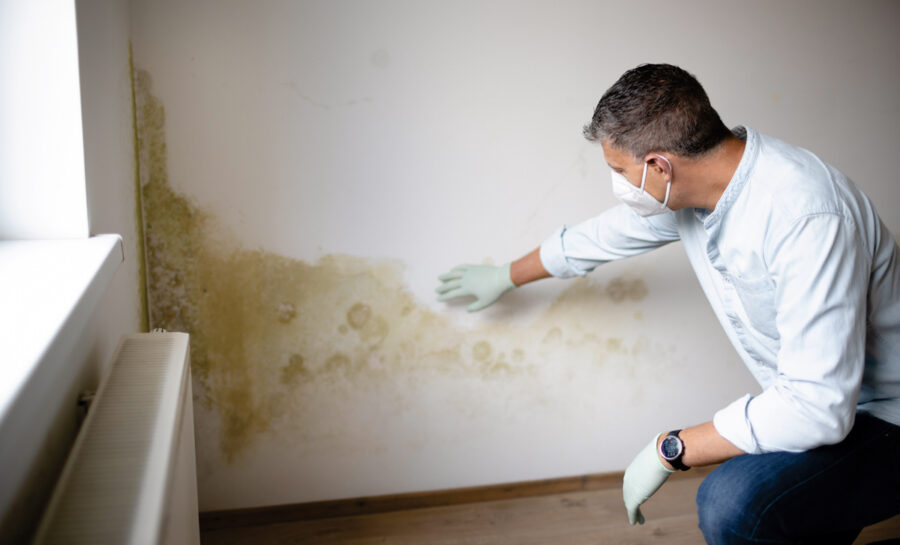
In a recent political ad for a Canadian Prime Minister Mark Carney, Mike Meyers answered the question: “What are the two seasons in Toronto?” with “Winter and construction.” Never have truer words been spoken on behalf of all builders! This year has seen no exception.
This spring started off with a bang but seems to be cooling off quickly, due in most part to the looming economic difficulties we all see in the coming months and years. This made me think: How can we try to keep the momentum in the region for improving our housing and making it more attainable? How much can a homeowner realistically do themselves to improve their home?

Figure 1
Generally, homeowners have two paths to choose from: hire a contractor or DIY. Further sorting of projects would reveal the fact that most homeowners can take on and tackle small things when needed, like painting or replacing a bathroom faucet, but do not have expertise in the majority of skills needed to do major projects to improve the envelope of our homes, like removing and replacing the insulation, or sealing the house and replacing windows. But even if homeowners do have those skills and the courage to take them on, what about the science? How do they know they are making the right choices in the basic design of the systems like walls and roofs, insulation, and windows? How do they do their due diligence on recommendations from contractors, for that matter? The good news is that there are resources.
As a high-performance builder, I spend as much time “building” my projects on paper (well, in the computer these days) as I do on-site building the home. When prospective homeowners approach me with a new custom project, I advise them that, realistically, it’s a year to design and permit, and a year to build, so planning is the most important aspect of any project.
In this, I use a wide array of advanced tools and calculations, which involve hours and hours of training, testing, and certification to utilize. But homeowners don’t need that, they just need to know if they are on the right path. Is the approach likely to undermine the long-term performance of the home, or is it scientifically sound—even if not ideal? Sealing and insulation—or wall assembly design—is one such place, and the one we will deal with in this article.
A wall assembly is not sexy. It’s utilitarian, but very important to the ability of a home to provide comfortable shelter for an extended period of time, at a reasonable cost. There is a lot more science in a well-designed wall assembly than even most builders understand. Fortunately, today we have internet calculators and processing engines available to help us.
If someone is the “math type,” they can access the formulas, do the calculations, and apply those results to a model. But even my Passive House modeler doesn’t do that. He uses a tool designed by the Passive House community to handle it—homeowners need something simpler and easier to learn. I recently discovered one online. Unfortunately, it’s designed for European climate zones and building materials (some of which are available here), and in the US, we don’t yet have a comparable calculator. Still, it’s truly simple (and fun!) to use, so it will do for now.
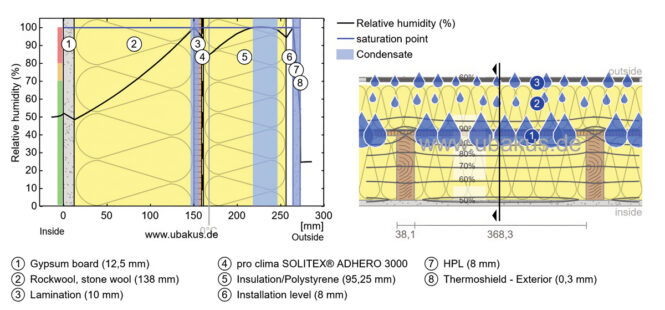
Figure 2
We entered the materials we chose (listed under Figure 1), described the sizes and dimensions, and hit enter. This is the graphic from the calculator described above, which shows an actual wall assembly we designed for a deep energy retrofit in Sullivan County, modeled in the colder months, when condensation is an issue.
Without going too deep into the science, the things that jump out for most folks are the blue water droplets, which represent moisure as condensation. This is vapor-generated moisture that actually begins in the home and migrates outward in cold weather, which then cools and appears as condensation somewhere in or on the wall. This is the science in a “heating” climate in the winter, the evidence of which we have all seen as frost on poorly performing windows on a cold winter morning. What we need to do is make sure that this “condensation plane” remains as close to the exterior of the wall system as we can get it, where it can’t really damage anything and has an oportunity to dry. In this instance, the condensation forms on or under the exterior sheathing, but only at very low temperatures (about 10 degrees F) with a humidity of 20 percent inside, and 50 percent outside, the typical readings for a winter day in the region. This is a well-designed wall, using the best specialty materials, installed per manufacturer specifications.
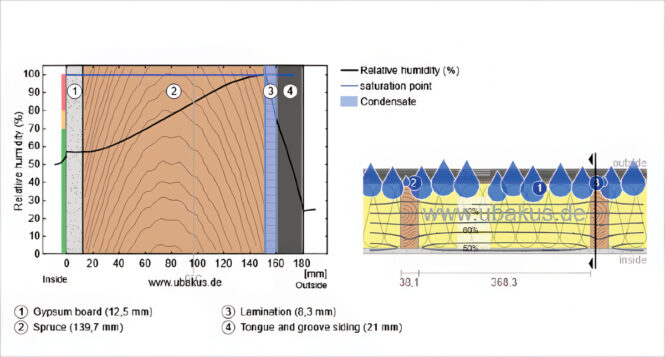
Now, look what happens when we remove item number two, the Intello vapor barrier (Figure 2). Notice the additional condensation that shows as more water droplets, forming deeper into the wall assembly in the graphic on the right, while the graphic on the left illustrates that the wood sheathing will now accumulate this condensation on the inside of the house! Over time this will rot that sheathing, and create conditions for extensive mold growth, and that’s bad. All we did was remove one thin vapor barrier on an otherwise well-designed wall assembly!
So we see that vapor barriers are important, but if you peel back the layers of the average home’s wall, you would find missing or uneven application of the vapor barrier as in Figure 3.
Figure 3
Right away the differences jump off the page, which is what a well-designed calculator should do. There is obviously a lot more condensation, what we call “wall rain” when it’s bad, which is a function of less insulation, no exterior insulation, and a poor or missing vapor barrier. But this is a common wall assembly in older homes throughout the valley! Cleverly, it also shows the thermal bridge by filling the space in the graphic on the left with wood instead of insulation. That’s the value of exterior insulation.
So many times we open a wall in an older home, especially on the sunny side of the house which has the widest temperature swings, to find water damage. When we explain to the homeowner that this damage was caused not by a leak from the outside, but from vapor condensing on the inside of the wall, it’s understanbly difficult to swallow. This makes it visible and understandable to anyone.
But what if all this still feels overwhelming? Even homeowners with the means to hire a contractor have several money-saving (and home-saving) options available. One approach is to engage an architect, engineer, or informed builder to design high-performance systems, then provide those plans to a contractor with clear instructions to follow them. (See previous article on how to scope a project in the summer 2024 issue of Upstate House.) A project calculator can help track progress and maintain accountability. It’s not necessary to implement every recommendation immediately—once a roadmap is in place, it’s easier to determine how far to travel at each step. And this is just one of many resources available to homeowners; others include Buildingadvisor.com and Greenbuildingadvisor.com. The former is a wonderful full spectrum advice and education site for homeowners to figure out different aspects of working on a home. Not always the latest and greatest, but no ‘bad’ information. Greenbuildingadvisor is a much geekier site, used best for perfecting a particular assembly, like a roof or a wall.
In these times of economic challenges, where advice and funding options for homeowners trying to do the right thing for their families and the environment are being removed for some unfathonable reason, it’s important that we have the ability and the encouragement to carry on with our goals. My column is and always will be dedicated to helping to make that a reality for as many as possible, but now I’m going to dig deeper into the “how to” and “what to use” subjects that can help even more. Let’s make this happen!